Postingan

Menampilkan postingan dengan label Non-Geeky Crafts

Pattern: Squid Cat Toy With Refillable Catnip Pocket

Gambar
I really, really like the Chronicles of a Yarn Obsession . It's such a staple in my pattern collection when I need a quick, cute gift for my cat-owning friends. Check out the changes I made to make a refillable catnip pocket that will truly drive your kitty wild! =^._.^= Materials: The materials needed for the Kitty Squid pattern  (scrap yarn, black yarn, crochet hook G, tapestry needle) Catnip Scrap piece of fabric (something to wrap the catnip such as a square of 3-4 inches in size, preferably a color that will blend in with the cat toy body) Sewable strip of Velcro (less than 2 inches, preferably white) Hand sewing needle  Sewing thread (pick a color that will blend in with the cat toy body) Instructions: 1) Follow the Kitty Squid pattern and finish making the squid body and attach the eyes, but don't stuff the body yet or sew it shut. 2) Flip the squid upside-down and open the base of the body. Cut a length of Velcro that will span the width o...

Pattern: Puppy In My Hand

Gambar
My 3-year-old son woke up one morning and said that he dreamed he had a little white dog in the palm of his hand. Despite the fact I haven't crocheted anything new in months, I was determined to make his dream come true. This is an English translation of Waldi by Conni Hartig , with some added notes that made things easier for me. Enjoy! Materials: 10 crochet thread (I used worsted yarn) 1.5 mm hook (I used a 4 mm size G hook) Polyester filling Back and red embroidery floss for face (I used 6 mm plastic safety eyes and a 9 mm nose) Tapestry needle Abbreviations: ch = chain dec = sc decrease  hdc = half double crochet inc = sc increase  rnd = round sc = single crochet sl st = slip stitch st = stitch Instructions: For the legs and the head/body, the pattern is worked continuously in a spiral; do not join. For the tail and ears, work flat and turn the work at the end of each row. Legs Magic ring , ch 1 Rnd 1: 6 sc in magic ring (6) Rnd 2: ...

14 Free Printable Open When Letters

Gambar
When Dexter was born, I was worried that I wouldn't be a good enough mom, so I read tons and tons of books and blogs. When Rosalina was born, I was worried that I would be too busy running around with two kids, leaving my marriage in the dust. Then I found thedatingdivas.com  website, which provides tons of free ideas for keeping the romance alive with date nights and love letters. What a great resource! So I've been busy for the past two months working on a massive series of "Open When" letters in time for our anniversary. Source: The Dating Divas If you haven't heard of them, it's a series of envelopes where you write a special note for your significant other (SO) to open when they're feeling happy, worried about something, need a pep talk, etc. However, instead of including letters in each one, I decided to comb the whole Dating Divas website for bigger and better ideas. They have tons of free printables, so all you mainly need is: Color pri...

Glam Zombie Makeup In 7 Easy Steps

Gambar
It's that time of the year again! Traditionally K has been the one that does both of our makeup jobs for the zombie crawl , but since I've been experimenting with makeup more this year, I decided to give it a shot myself. I'm not into the gore factor as much, so I looked at "glam zombie" examples for inspiration. Based on some tutorials, I simplified the makeup to 7 easy steps that only cost me $4 in white face paint from a Halloween costume store (since I already owned everything else). Can there be such a thing as a glamorous zombie? (Sources: Beautylish ,  Sccastaneda ,  Marie Claire ) Materials $4 white grease paint or clown white paint Eyeshadow: charcoal black, plum red or brown Black eyeliner Red lip gloss Makeup brushes or sponges Black nail polish (optional) Makeup fixer spray (optional) Baby wipes Eye makeup remover Baby shampoo Step 1: Foundation After washing your face, put on the top of your outfit and trace or dot the n...

How To Take Newborn Photos Like A Professional

Gambar
When Dexter was 2 weeks old, I had a Groupon discount for a studio photography session for a disc of 10 digital, retouched images. It was a really good deal and the photographer did decent work, but in hind sight, I feel that Dexter came out looking kinda... weird. Above: newborn Dexter taken by a professional with studio lighting and heavy editing Below: newborn Rosalina taken by me with natural lighting and minor editing Since then I have paid for a photo session of our entire family (this time in an outdoor setting), and again, I feel like most of the images didn't have us looking our best. Maybe I'm just super picky or there wasn't enough time to get our kid in the best of moods. Then I saw this article on DIY newborn photography . Wow, if I could make my own setup at home and take pictures over the course of many days to get that perfect pose, maybe I could produce results that looked professional (and several hundred dollars cheaper). Materials The only...

Poll: A Superhero Mask For Making Secret Identity Selfies?

Gambar
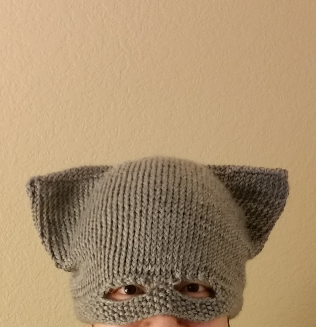
I'm totally enthralled with the newness of my Instagram account right now and have been posting daily pictures based on Fat Mum Slim's photo-a-day challenge list . However, I'm a little jealous of other people's ability to post selfies since, as an anonymous blogger, I can't really show my face. :) But what if... I could somehow hide my face, like a superhero or something? Ooo, idea forming... Thus began my quest for the perfect mask. 1) Zsa Mask My first attempt at making a mask seemed to fit all the requirements: the majority of my face/head would be covered and it kinda looked like a superhero/cat hat, which is super cute, right? Mmm, not so much. Maybe a kid could get away with it, but when I put on the simpulan creation, I seriously got this weird vibe, like I was cosplaying for a furry convention (if you don't know what I'm talking about, don't look it up). In fact, K walked in on me trying it out for the first time and totally burst out laughin...